Tkintertoy 1.6 Tutorial
Date: Aug 07, 2023 Author: Mike Callahan
Introduction
Tkintertoy grew out of a GIS Python (mapping) class I taught at a local college. My students knew GIS but when it came time to put the workflows into a standalone application, they were stumped with the complexity of programming a GUI, even with Tkinter. So I developed an easy to use GUI library based on Tkinter that made it much simpler to code applications. After several trials, the result was Tkintertoy which is easy to use, but also can be create more complex GUIs. I have been teaching a Python class in a local vocational technical college using Tkintertoy with great success.
With this version, I have fixed a few minor bugs, improved the documentation, improved the operation of the library, and cleaned up the code for version 1.6. Support for Python 2 was removed since the library is no longer tested using Python 2.
Tkintertoy creates Windows which contain widgets. Almost every tk or ttk
widget is supported and a few combined widgets are included. Most widgets
are contained in a Frame which can act as a prompt to the user. The widgets
are referenced by string tags which are used to access the widget, its
contents, and its containing Frame. All this information is in the content
dictionary of the Window. The fact that the programmer does not need to keep
track of every widget makes interfaces much simpler to write, one only needs
to pass the window. Since the widgets are multipart, I call them ttWidgets.
Tkintertoy makes it easy to create groups of widgets like radio buttons, check boxes, and control buttons. These groups are referenced by a single tag but individual widgets can be accessed through an index number. While the novice programmer does not need to be concerned with details of creating and assigning a tk/ttk widget, the more advanced programmer can access all the tk/ttk options and methods of the widgets. Tkintertoy makes sure that all aspects of tk/ttk are exposed when the programmer needs them. Tkintertoy is light-weight wrapper of Tkinter and can be used a gentle introduction to the complete library.
The Zen of Tkintertoy
- It must be very simple to use. Not much more complicated than
inputorprint. - It must produce well-balanced and clean, if simple, interfaces.
- It must be very light-weight and easy to install. Everything is basically in one file, tt.py.
- It must be based on Tkinter. Tkinter is still the default Gui library for Python. After working in Tkintertoy, the student can easily move into more complex Tkinter.
- The source code should be easy to follow.
In the following examples below, one can see how the ideas in Tkintertoy can be used to create simple but useful GUIs. GUI programming can be fun, which puts the “toy” in Tkintertoy.
A “Hello World” Example
Let’s look at a bare bones example of a complete GUI using imparative style. Imparative code are sometimes called scripts since their structure is simple. More complex code are ususally called applications.
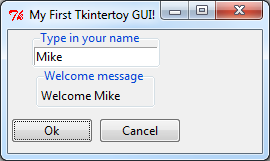
This GUI will ask for the user’s name and use it in a welcome message. This example uses these widgets: ttEntry, ttLabel, and ttButtonbox.
In relating this application to a command-line application, the entry replaces the input
function, the label replaces the print function, and the buttonbox replaces the Enter
key. Below is the code followed by an explanation of every line:
Here is a screen shot of the resulting GUI:
Here is an explanation of what each line does:
- Import the
Windowcode which is the foundation of Tkintertoy. - Create an instance of a
Windowobject assigned togui. This will initialize Tk, create a Toplevel window, create an application Frame, and create acontentdictionary which will hold all the widgets. - Change the title of
guito “My First Tkintertoy GUI!”. If you don’t do this, the title of theWindowwill default to “Tk”. If you want no title, make the argument ‘’ (a null string) or None. - Add an ttEntry widget to
gui. This will be the combination of a ttk.Entry in a ttk.LabelFrame. We are going to tag it with ‘name’ since that is what we going to collect there. However, the tag can be any string. All Tkintertoy widgets must have a unique tag which acts as the key for the widget in thecontentdictionary. However, most of the time the programmer does not access thecontentdictionary directly, Tkintertoy provides methods for this. The title of the Frame surrounding the Entry widget will be ‘Type in your name’. Entry frame titles are a great place to put instructions to your user. If you don’t want a title, just leave off this argument. Tkintertoy will use a plain ttk/tk.Frame instead. The default width of the Entry widget is 20 characters, but this, like many other options can be changed. - Add a ttLabel widget to
gui. This will be the combination of a ttk.Label in a ttk.LabelFrame. This tag will be ‘welcome’ since this where the welcome message will appear. Labels are a good widget for one line information to appear that the user cannot edit. The explanation to the user of the type of information displayed in the ttLabel is displayed in the LabelFrame, just like in the ttEntry - Add a ttButtonbox row with a tag of ‘commands’. It defaults to two ttk.Buttons,
labeled ‘Ok’ and ‘Cancel’ contained in a unlabeled ttk.Frame. Each button is connected
to a function or method, called a “callback” which will execute when the user clicks on
that button. The default callback for the ‘Ok’ button is the
breakoutmethod which exits the GUI processing loop but keeps displaying the window. This will be explained below. The ‘Cancel’ button callback is thecancelmethod which exits the loop, removes the window, and empties thecontentdictionary. Of course, the button labels and these actions can be easily modified by the programmer, but by providing a default pair of buttons and callbacks, even a novice programmer can create a working GUI application quickly. No callback programming is necessary. - Place the ‘name’ ttwidget at column 0 (first column), row 0 (first row) of
guicentered. The second argument is the column (x dimension counting from zero) and the third argument is the row (y dimension). Both these value default to 0 but it is a good idea to always include them. Theplotxymethod is basically the tkgridmethod with the column and row keywords arguments specified. All other keyword arguments togridcan be used inplotxy. Plot was selected as a better word for a novice. However,gridwill also work. Until a widget is plotted, it will not appear. However, theguiwindow is automatically plotted. Actually, you are plotting the ttk.LabelFrame, the ttk.Entry widget is automatically plotting in the Frame filling up the entire frame using sticky=’nswe’. - Place the ‘welcome’ widget at column 0, row 1 (second row) of
guicentered. There is a 3 pixel default vertical spacing between widget rows. - Place the ‘command’ widget at column 0, row 2 of
guicentered with a vertical spacing of 10 pixels with pady=10. - Begin an infinite loop.
- Wait for the user to press click on a button. The
waitforUsermethod is a synonym for the tkmainloopmethod. Again, the name was changed to help a novice programmer. However,mainloopwill also work. This method starts the event processing loop and is the heart of all GUIs. It handles all key presses and mouse clicks. Nothing will happen until this method is running. This loop will continue until the user clicks on the either the ‘Ok’ or ‘Cancel’ button. Clicking on close window system widget will have the same action as clicking on the ‘Cancel’ button. This action is built-in to all Tkintertoy windows. - To get to this line of code, the user clicked on a button. Test to see if the
contentdictionary contains anything. If it does, the user clicked on the ‘Ok’ button. Otherwise, the user clicked on the ‘Cancel’ button. - To get to this line of code, the user clicked on the ‘Ok’ button. Collect the contents of
‘name’ and add it to the “Welcome” string in ‘welcome’. This shows how easy it is to get
and set the contents of a widget using the given methods. To get the value of a widget call
the
getmethod. To change the value of any widget call thesetmethod. The type of widget does not matter,getandsetwork for all widgets. Since all widgets are contained in thecontentdirectory ofgui, the programmer does not need to keep track of individual widgets, only their containing frames or windows. Again, the usually programmer does not accesscontentdirectly, they should usegetandsetmethods. - This line of code is reached only if the user clicked on ‘Cancel’ which emptied the
contentdirectory. In this case, the user is finished with the application. - Break the infinite loop and exit the program. Notice the difference between the infinite
application loop set up by the
whilestatement and the event processing loop set up by thewaitforUsermethod. Also, note that when the user clicked on ‘Cancel’, the tkintertoy code exited, but the Python code that called tkintertoy was still running. This is why you must break out of infinite loop.
So you can see, with 15 lines of code, Tkintertoy gives you a complete GUI driven application, which will run on any platform Tkinter runs on with little concern of the particular host. Most Tkintertoy code is cross platform.
Simple Map Creation Dialog
Below is the code to create a simple dialog window which might be useful for a GIS tool which creates a map. This example was also written in imparative style in order to help the typical GIS or novice Python script writer. Procedure and object-oriented style coding will be demonstrated later.
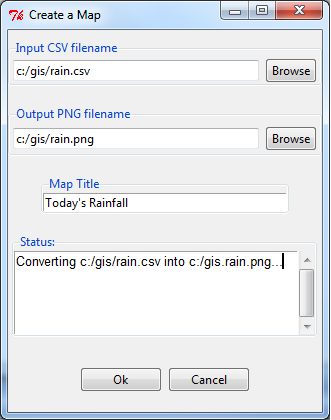
We will need the filename of the input CSV file, the output PNG map image, and the title for the map. We will use the following widgets: ttOpen, ttSaveAs, ttEntry, and ttText as a status window.
We want the layout for the dialog to look like this:
Here is the code (we will not worry not the code that actually creates the map!):
Each line of code is explained below:
- Import the
Windowobject from tkintertoy. - Create an instance of a
Windowand label itgui. - Set the title
guito “Create a Map”. - We want to limit the input files to .csv only. This list will be used in the method in the next line. Notice, you can filter multiple types.
- Add an ttOpen dialog widget. This is a combination of a ttk.Entry widget, a ‘Browse’ ttk. Button, and a ttk.LabelFrame. If the user clicks on the ‘Browse’ button, they will see a directory limited to CSV files. To allow the user to see the entire path, we changed the width of the entry to 40 characters.
- We want to limit our output to .png only.
- Add a ttSaveAs dialog widget. This is a combination of a ttk.Entry widget, a ‘Browse’ ttk. Button, and a ttk.LabelFrame. If the user clicks on the ‘Browse’ button, they will see a directory limited to PNG files. If the file already exists, an overwrite confirmation dialog will pop up.
- Add an ttEntry widget that is 40 characters wide to collect the map title.
- Add a ttText widget, which is a combination of a ttk.Text widget, a vertical ttk.Scrollbar, and a ttk.LabelFrame. It will have a width of 40 characters, a height of 5 lines, and will be used for all status messages. The ttText widget is extremelly useful for many different purposes.
- Add a ttButtonbox with the default ‘Ok’ and ‘Cancel’ buttons.
- Plot the ‘input’ widget at column 0, row 0, vertically separating widgets by 10 pixels.
- Plot the ‘output’ widget at column 0, row 1, vertically separating widgets by 10 pixels. Notice this will cause a 20 pixel separation between the input and output widgets.
- Plot the ‘title’ widget at column 0, row 2, vertically separating widgets by 10 pixels.
- Plot the ‘status’ widget at column 0, row 3, vertically separating widgets by 10 pixels.
- Plot the ‘commands’ widget at column 0, row 4, vertically separating widgets by 20 pixels. This will be 30 pixels from the status widget.
- Enter the event processing loop and exit when the user clicks on a button. This script will execute once so there is no need for an infinte loop.
- If the user clicked on the OK button do the following:
- Create the status message.
- Display the status message.
- Pretend we are making a map but in reality just pause for 5 seconds so the user can see the status message.
- This is where the actual map making code would begin.
- Exit the program.
Notice, if the user clicks on the Cancel button, the program exits at line 17.
Selection Widgets
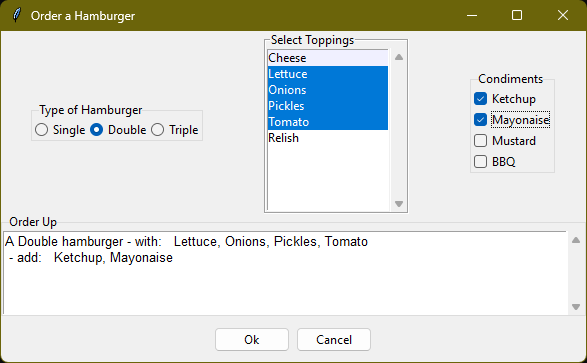
Many times you want to limit the user to a fixed set of options. This next example demonstrates widgets that are useful for this task. We will create a hamburger ordering application which will use three type of selection widgets: ttRadiobox, ttCheckbox, and ttListbox. We will stay with imparative style programming.
Radiobox widgets are great for showing the user an list of dependent options. Only one option in the group can be selected at a time. The name “radiobutton” comes from old-fashioned car radio tuner buttons, when you pushed one to change a station, the previous one selected poped-up.
Checkboxes allow the user to select many independent options at a time. Listboxes can be programmed to do both.
We will use a radiobox to select whether the user want a single, double, or a triple burger. We will use a listbox to indicate which toppings the user wants, and a checkbox to indicate the desired condiments.
Below is a screenshot of the application:
Here is the code:
- Import the
Windowobject from tkintertoy. - Create an instance of a
Windowand label itapp. - Set the title
appto “Order a Hamburger”. - Create a list of burger types.
- Add a ttRadiobox which is a list of three ttk.Radiobuttons labeled with the type of burgers. These will be referenced with a single tag, ‘type’. If we want to reference a single Radiobutton, we will use an index; [0], [1], or [2].
- Create a list of burger toppings.
- Add a ttListbox which is a tk.Listbox with a vertical tk.Scrollbar. The elements are the items in the list of toppings. Notice that selectmode=’multiple’ so the user will be able to select multiple toppings without pressing the control or shift keys. This is a good example of when a listbox is useful for multiple options. While it does take up screen space, it makes it easy to select many multiple options but restricts the user to a fixed set of options.
- Create a list of condiments.
- Create a ttCheckbox which is a list of three ttk.Checkbuttons labeled with the condiments. The orientation will be vertical. This is another widget where the user can select multiple options. It is best used with a small number of options.
- Add a ttText with a height of 5. This is where the order will appear. Note that the width of the text widget determines the width of the entire application.
- Add a ttButtonbox with the default ‘Ok’ and ‘Cancel’ buttons.
- Plot the ‘type’ widget at column 0, row 0.
- Plot the ‘toppings’ widget at column 1, row 0.
- Plot the ‘condiments’ widget at column 2, row 0.
- Plot the ‘order’ widget at column 0, row 1, strectched across three columns with colunmspan=3.
- Plot the ‘commands’ widget at column 0, row 2, also stretched across three columns.
- Blank line
- Begin a infinite loop.
- Enter the event processing loop and exit when the user clicks on a button.
- If the user clicked on the OK button do the following:
- Get the burger type.
- Get the selected toppings list.
- Get the selected condiments list.
- Start the order message. The allValue=True clears the text widget of any previous orders.
- If the user selected any toppings…
- Add the toppings phrase in the ‘orders’ widget.
- Create a string containing the selected toppings separated by a comma.
- Add it to the ‘orders’ widget.
- If the user selected no toppings…
- Mark the burger as plain.
- If the user selected any condiments…
- Add the condiments phrase.
- Create a string containing the selected condiments separated by a comma.
- Add it to the order.
- Reset the ‘type’ widget.
- Reset the ‘toppings’ widget.
- Reset the ‘condiments’ widget and loop back to 19.
- If the user clicked on the ‘Cancel’ button…
- Break the infinate loop. The Tkintertoy application was automatically canceled.
This is a example showed some of the selection widgets that are available in Tkintertoy. The best one to use is up to the programmer’s discretion. As you can see, this code is getting too long for imparative style. We will use procedure style in the next example.
Dynamic Widgets
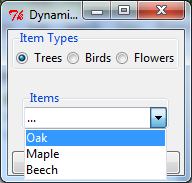
A very useful technique is to create a widget which is dependent on the contents of another widget. The code below shows a ttCombobox which is dependent on a ttRadiobox row.
The trick to have the contents of a combobox be dependent on a radiobox, is to create a combo widget and then create a callback function which looks at the contents of the radiobox and then sets the item list attribute of the combo widget. This time we will use procedure style code which is a more advanced style but still accessable to the novice programmer. We will also do a better job in adding comments to the code.
Here is the screenshot:
The callback function will have to know the widget that called it which is included when the Window is passes as an argument, which will lead to some strange looking code. This complexity can be eliminated by writing in an object-oriented fashion, which will be covered in the next example.
Below is the code:
Below explains every line:
- Import
Windowfrom tkintertoy. - Blank line.
- Define the callback function,
update. It will have a single parameter, the callingWindow. - This is the function documentation string. It is a great idea to have a documentation string for every function and method. Since we are using the triple quote our comment can exceed a single line.
- These next three lines define the lookup dictionary.
- Same
- Same
- Get the category the user clicked on. This shows an advantage of Tkintertoy’s content directory. All widgets are included in the window. The programmer does not have to pass individual widgets.
- Using this category as a key, set all the values in the ttCombobox widget list to the list returned. by the lookup dictionary, rather than the entry widget. This is why allValues=True.
- Change the entry value of ‘items’ to ‘…’ which is why allValues=False. This will overwrite any selection the user had made. The allValues option has different effects depending on the widget type.
- Blank line.
- Create the main function,
main. It will have no parameters. Most Python applications have a main driving function. - The documentation line for
main - Create the three categories.
- Create an instance of
Windowassigned togui. - Set the title for
gui. - Add a ttRadiobox box using the categories.
- Add a ttCombobox widget. This is a combination of a ttk.Combobox contained in a ttk.LabelFrame. This
widget will update its items list whenever the user clicks on a radiobox button. This is an example of using
the postcommand option for the combobox. Normally, postcommand would be assigned to a single method or
function name. However, we need to include
guias an parameter. This is whylambdais there. Do not fearlambda. Just think of it as a specialdefcommand that defines a function in place. - Add a ttButtonbox with the default ‘Ok’ and ‘Cancel’ buttons.
- Initialize the items widget entry widget to just three dots. This lets the user know there are selections available in the pulldown.
- Plot the category widget at column 0, row 0.
- Plot the items widget at column 0, row 1.
- Plot the command buttons at column 0, row 2.
- Start the event processing loop and wait for the user to click on a button. Notice that as the user clicks on a category button, the list in the items combobox changes and the event loop keeps running. We do not need an infinite loop.
- If the user clicked on ‘Ok’ by seeing if content is not empty.
- Retrieve the value of the category widget using the get method.
- Retrieve the value of the items widget that was selected or typed in.
- This where the actual processing code would start.
- Exit the program. Calling
cancelis the same as clicking on the Cancel button. - Blank line.
- Call
main. Even though we definedmainabove, Python will not execute the function until we call it.
Object-Oriented Dynamic Widgets
While I told you to not fear lambda, if you write code in an object-oriented mode, you don’t have to be concerned about lambda. One can write complex guis in Tkintertoy without object-oriented style, which might be better for novice programmers, but most guis should be oject-oriented once the programmer is ready. While, the details of writing object-oriented code is far beyond the scope of this tutorial, we will look at the previous example in an object-oriented mode using composition. You will see, it is not really complicated at all, just a little different. The GUI design did not change.
Below is the new code:
And the line explanations:
- Import
Windowfrom tkintertoy. - Blank line.
- Create a class called
Gui. This will contain all the code dealing with the interface. We are not inheriting from a parent class in this example. We will see how to do this in another example below. - This is a class documentation string. It is a great idea to document all classes, too.
- Blank line.
- Create an initialize method that will create the interface, called
__init__. This strange name is required. Methods names that begin and end with double underscore are special in Python. - This is the method documentation string.
- Create the three categories.
- Create an instance of
Windowassigned toself.gui. The self means gui is an attribute of the instance and all methods in the class will have access toself.gui. - Set the title for
self.gui. - Add a ttRadiobox using the categories.
- Add a ttCombobox widget which will update its items list whenever the user clicks on a radiobox
button. Notice that the postcommand option now simply points to the callback method without
lambdasince ALL methods can accessself.gui. This is the major advantage to object-oriented code. It reduces argument passing. - Add a ttButtonbox with the default ‘Ok’ and ‘Cancel’ buttons.
- Initialize the items widget.
- Plot the category widget at column 0, row 0.
- Plot the items widget at column 0, row 1.
- Plot the command buttons at column 0, row 2.
- Blank line.
- Create the callback method using the
selfparameter. - This is the method documentation string.
- These next three lines define the lookup dictionary.
- Same
- Same
- Get the category the user clicked on.
- Using this category as a key, set all the items in the combobox widget list to the list returned by the lookup dictionary, rather than the entry widget, which is why allValues=True.
- Clear the items widget.
- Blank line.
- Create the main driving function.
- Main documentation string.
- Create an instance of the
Guiclass labeledapp. Notice thatapp.guiwill refer to theWindowcreated in the__init__method andapp.gui.contentwill have the contents of the window. - Start the event processing loop and wait for the user to click on a button.
- If the user clicked on Ok…
- Retrieve the value of the category.
- Retrieve the value of the entry part of the combobox.
- This where the actual processing code would start.
- Blank line.
- Call main.
Notice if the user clicks on ‘Cancel’ there is no more code to execute.
There are very good reasons for learning this style of programming. It should be used for all except the simplest GUIs. You will quickly get use to typing “self.” All future examples in this tutorial will use object-oriented style of coding.
Using the Collector Widget
This next example is the interface to a tornado path generator. Assume that we have a database that has tornado paths stored by date, counties that the tornado moved through, and the maximum damaged caused by the tornado (called the Enhanced Fajita or EF scale).
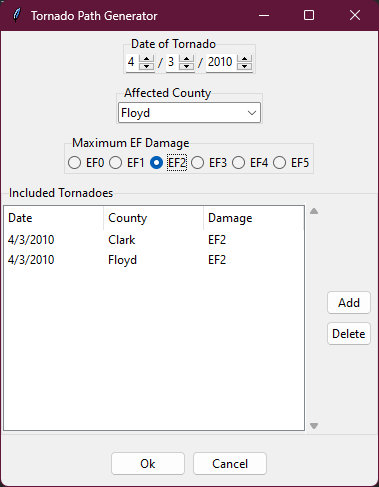
This will demonstrate the use of the ttCollector widget, which is a combination of a ttk.Treeview, and two ttk.Buttons. It acts as a dialog inside a dialog. Below is the screenshot:
You can see for the date we will use a ttSpinbox. A ttSpinbox is a group of tk/ttk.spinboxes that are
limited to integers, separated by a string, and contained in a tk/ttk.Frame. This is a excellent widget for
dates, times, social security numbers, etc. The get method will return s string with the values of each
box, with the separtor in between. The set method also requires the separtor in the string.
The county will be a ttCombobox widget, the damage will use ttCheckbox and all choices will be shown in the ttCollector widget. Here is the code:
Here are the line explanations, notice the first steps are very similar to the previous example:
- Import
Windowfrom tkintertoy. - Blank line.
- Create a class called
Gui. This will contain all the code dealing with the interface. - This is a class documentation string.
- Blank line.
- Create an initialize method that will create the interface. All methods in the class will have
access to
self. - This is the method documentation string.
- Create a list of county names.
- Same
- Create a list of damage levels.
- Create the parameter list for the date spinner. The first digit is the width in characters, the second is the lower limit, the third is the upper limit.
- The initial date will be 1/1/1980.
- Set up the column headers for the ttCollector widget. The first value is the the header string, the second is the width of the column in pixels.
- Create an instance of
Windowlabeledself.gui. Again, theselfmeans that every method in the class will have access. Notice, there are no other methods in this class so making gui an attribute of self is unnecessary. However, it does no harm, other programmers expect it, and future methods can be added easily. - Set the title of
self.guito “Tornado Path Generator”. - Add a date ttSpinbox. This is a combination of 3 ttk.Spinboxes seperated by a slash (/) contained in a ttk.LabelFrame. It will be labeled ‘tdate’ in order to not cause any confusion with a common date library.
- Set the ‘tdate’ to the default. Notice to set and value of a spinbox you use a string with seperators.
- Add a county ttCombobox.
- Add a damage level ttCheckbox.
- Add a ttCollector. The collector has a tag, the column header list from line 13, a list of the widget tags it needs to collect, and the propmt. It also includes two buttons, ‘Add’ and ‘Delete’. Clicking on ‘Add’ will collect the values in the widgets and add them in a line in the treeview. Clicking on ‘Delete’ will delete the currently selected line in the treeview.
- Same.
- Add a ttButtonbox with the default ‘Ok’ and ‘Cancel’ buttons.
- Plot the ‘tdate’ widget at column 0, row, 0, separating the widgets by 5 pixels.
- Plot the ‘county’ widget at column 0, row 1, separating the widgets by 5 pixels.
- Plot the ‘damage’ level widget at column 0, row 2, separating the widgets by 5 pixels.
- Plot the ‘path’ widget at column 0, row 3, separating the widgets by 5 pixels.
- Plot the ‘command’ widget at column 0, row 4, separating the widgets by 10 pixels.
- Blank line.
- Create a
mainfunction. - This is the function documentation.
- Create an instance of the
Guiclass which will create the GUI. - Start the event processing loop
- If the user clicked on ‘Ok’…
- Get all the lines in the collector as a list of lists.
- This is where the tornado path generation code would begin but we are just going to print the data in a pop-up information window. The example gives [[‘4/3/2010’, ‘Clark’, ‘EF2’], [‘4/3/2010’, ‘Floyd’, ‘EF2’]].
- Call the driving function.
When you click on ‘Add’, the current selections in ‘tdate’, ‘counties’, and ‘level’ will be added into the collector widget in a row. If you select a row and click on ‘Delete’, it will be removed. Thus the collector acts as a GUI inside of a GUI, being fed by other widgets. If this was a real application, we would generate a tornado path map of the EF-2 tornadoes that moved through Clark and Floyd counties on April 4, 2010.
Using the Notebook Container
Tkintertoy includes containers which are Windows within Windows in order to organize widgets.
A very useful one is the ttNotebook which is a ttk.Notebook. This example shows a notebook that
combines two different map making methods into a single GUI. This will use the following widgets:
ttEntry, ttCheckbox, ttText, ttSpinbox, and ttButtonbox. The style of code will
stay with composition.
Below is a screenshot:

Here is the code. We will also demonstrate to the set and get the contents of more widgets and introduce some simple error trapping:
Here are the line explanations:
- Import datetime for automatic date functions
- Import
Windowfrom tkintertoy. - Blank line.
- Create a class called
Gui. This will contain the code dealing with the interface. - Class documentation string.
- Create an initialize method that will create the interface. All methods in the class will have
access to
self. - This is the method documentation string.
- Create an instance of
Windowthat will be asignned to an attributedialog. All methods in this class will have access. - Set the title of the window to Mapper 1.0.
- This code section is for the notebook widget.
- Create a list which contains the names of the tabs in the notebook: ‘Routine’ & ‘Accumulate’. ‘Routine’ will make a map of one day’s rainfall, ‘Accumulate’ will add up several days worth of rain.
- Add a ttNotebook. The notebook will return two
Windowsin a list which will be used as a container for each notebook page. - This code section is for the ‘Routine’ notebook page.
- Assign the first page (page[0]) of the notebook, which is a
Windowto an attributeroutine. - Get today’s date.
- Convert it to [date, month, year, month abr]; ex. [24, 6, 2023, ‘Jun’]
- Add a title ttEntry widget. This will be filled in dynamically and be the title of the map.
- Set the title using today’s date.
- Same.
- Plot the title at column 0, row 0.
- Add an output filename ttEntry widget. This will also filled in dynamically.
- Set the output filename using today’s date.
- Plot the output filename widget at column 0, row 1.
- Create a list of two types of jobs: Make KMLs & Make Maps.
- Add a jobs ttCheckbox.
- Turn on both check boxes, by default.
- Plot the jobs widget at column 0, row 2.
- This code section is for the ‘Accumulate’ notebook page.
- Assign the second page (page[1]) of the notebook, which is a
Windowto an attributeaccum. - Create the list for the parameters of a date spinner.
- Add an ending date ttSpinbox, with the callback set to self.updateAccum().
- Same.
- Set the ending date to today.
- Plot the ending date widget at column 0, row 0.
- Add a single days back ttSpinbox with the callback set to self.updateAccum() as well.
- Same.
- Set the default days back to 2.
- Plot the days back widget at column 0, row 1.
- Add a title ttEntry. This will be filled in dynamically.
- Plot the title widget at column 0, row 2.
- Add an output filename ttEntry. This will be filled in dynamically.
- Plot the output filename widget at column 0, row 3.
- Fill in the title using the default values in the above widgets.
- This section of code is for the rest of the dialog window.
- Add a messages ttText. This is where all messages to the user will appear.
- Plot the messages widget at column 0, row 1 of the dialog window. The notebook will be at column 0, row 0.
- Add a command ttButtonbox, the default are labeled Ok and Cancel.
- Set the callback for the first button to the
gomethod. We are changing the command parameter. This shows how easy it is to get to the more complex parts of Tk/ttk from tkintertoy. ThesetWidgetallows the programmer to change any of the tk/ttk options after the widget is created. - Set the label of the second button to
Exitusing the same method as above but changing the text parameter. This shows how options of buttons can be dynamic. - Plot the command buttons at column 0, row 2.
- Plot the notebook at column 0, row 0.
- Set the default notebook page to ‘Routine’. This will be the page displayed when the application
first starts. Note that
setandgetuse the notebook tab names. - Blank line.
- This method will update the widgets on the ‘Accumulate’ tab.
- This is the method documentation string.
- Get the ending date from the widget. This is an example of a use of a list comprehension. The
getmethod will return a date string. Thesplitmethod will return a list of str, and the list comprehension convert the values to ints. The result will be [month, day, year]. - This will turn the list of ints into a datetime object.
- Turn the object into a comma-separated string ‘date-int, month-int, year, month-abrev’ like ‘24,6,2023,Jun’.
- Get the number of days back the user wanted.
- Set the title of the map in the title widget. As the user changes the dates and days back, this title will dynamically change. The user can edit this one last time before they click on ‘Ok’.
- Calculate the beginning date from the ending date and the days back.
- Convert the datetime into a list of strings [‘date-int’,’month-int’] like [‘22’,’6’].
- Same.
- Set the title of the map file to something like ‘accum06022-06242023’. Again, this will be dynamically updated and can be overridden. Notice that one method is updating two widgets.
- Same.
- Blank line.
- This method will execute the correct the map generation code.
- This is the method documentation string.
- Get the selected notebook tab name.
- Create an instance of a Mapper object. However, we have a chicken/egg type problem. Mapper must know
about the Gui instance in order to send messages to the user. That is why the Mapper instance must
be created after the Gui instance. However, the Gui instance must also know about the Mapper instance
in order to execute the map making code. That is why the Mapper instance is created inside of this
method. The Gui instance
selfis used as an argument to the Mapper initialization method. It looks funny but it works. - Blank line.
- This code might fail so we place it in a try…except block.
- If the current tab is ‘Routine’…
- Run the routine map generation code.
- If the current tab is ‘Accumulate’…
- Run the accumulated map generation code.
- Catch any exceptions.
- Place all error messages into the messages widget. Any error messages will pop-up in a window.
- Blank line.
- Create a
Mapperclass which contains all the map generation code. This will be a stud here since map generation code is well beyond the scope of this tutorial. - Class documentation line.
- Blank line.
- Create an initialize method that will contain all the map making methods. For this example, this will be mainly stubs since actual GIS code is well beyond the scope of this tutorial.
- Method documentation lines.
- Same.
- Make the Gui object an attribute of the instance so all methods have access.
- Blank line.
- This method contains the code for making the routine daily precipitation map.
- Method documentation line.
- Get the desired map title. This will be used in the magic map making code section.
- Get the filename of the map.
- Send a message to the user that the magic map making has begun.
- This is well beyond the scope of this tutorial.
- Blank line.
- This method contains the code for making accumulated precipitation maps, that is, precipitation that fell over several days.
- Method documentation line.
- Get the desired map title. This will be used in the magic map making code section.
- Get the filename of the map.
- Send a message to the user that the magic map making has begun.
- This is well beyond the scope of this tutorial.
- Blank line.
- The
mainfunction. - Create the GUI.
- Run the GUI.
- Blank line.
- Standard Python. If you are executing this code from the command line, execute the main function. If importing, don’t.
Object-Oriented Style Using Inheritance
This example gets away from map maiking and is a demonstation of writting in an object-oriented
style using inheritance. This is the style most textbooks will use when explaining GUI creation.
Inheritance means that the application window will inherit all the features of a Tkintertoy
Window. So instead of refering to the tkintertoy window in the class as self.gui you would
use just self. Think of composition as the application has a Window and inheritance as the
application is a Window.
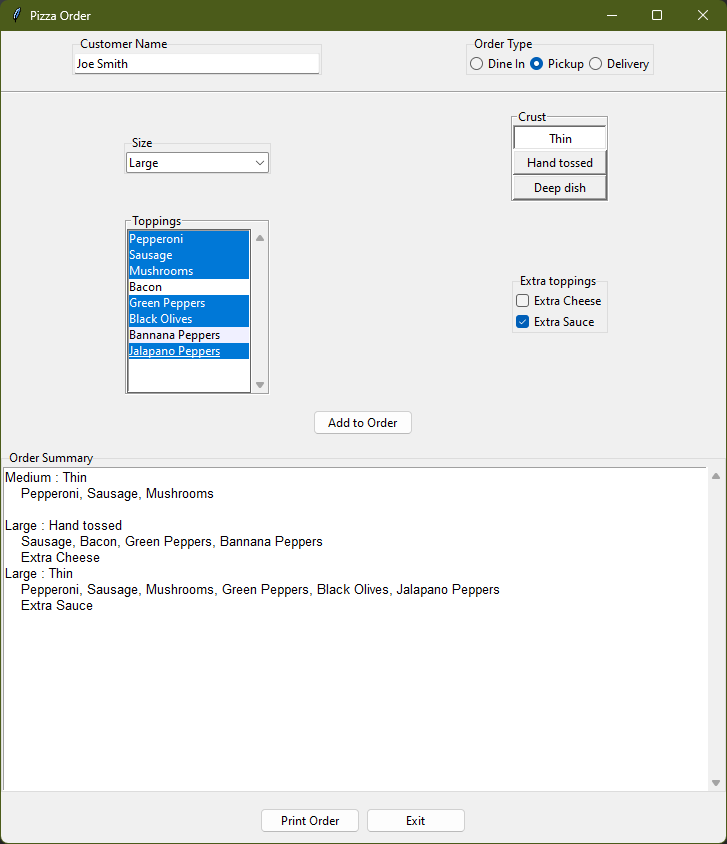
The example below is a pizza ordering system. It demostates several ttwidgets: ttEntry, ttRadiobox, ttCombobox, ttLine, two ttCheckboxes with the indicator off and on, ttListbox, ttText, and several ttButtons.
This application works as follows. The user first fills in the customer’s name in the entry and
how they are going to get their pizzas in a radio button group with the indicator on. Next, for
every pizza, the user selects a size using a combo and crest type using a radio group with the
indicator off. Next, they click on the the toppings the customer asked for using a scrolling list.
Now, the user add extra cheese or extra sauce of both using a check group. Once the order for
the pizza is complete, the user clicks on the Add to Order button. This sends the pizza
order to the text box and clears the pizza option widgets, making ready to enter the next pizza.
When all the pizzas are entered. The user clicks on Print Order, which here just prints
the user’s name, their delivery method, and their pizzas on the terminal. In real life this
information would go to another system.
Below is a screenshot:
Here is the code. We will also demonstrate to the set and get the contents of more widgets and introduce some simple error trapping:
Here are the line explanations:
- Import Window from tkintertoy.
- Blank line.
- Create a class
PizzaGuithat inherits fromWindow. You can think ofPizzaGuias a child ofWindow. - Class documentation.
- Blank line.
- Create an instance of
PizzaGui. - Method documentation.
- Initial an instance of
Windowand assign it toself. This is how to call the initialzation code of the parent class. This will make the instance ofPizzaGuian instance ofWindow. - Blank line.
- This method will contain all the code to create the GUI.
- Method documetation.
- Set the title of the window.
- Create a toppings tuple. This could have been a list as well.
- Same.
- Create a crust-type tuple.
- Create an order-type tuple.
- Create a extra tuple.
- Create a size tuple.
- Create a command list for the command buttons.
- Add an entry for the customer name.
- Add a radiobox for the order type.
- Add a ttLine. This is a horizontal ttk.Separtor which will strectch across the entire window. It has no frame.
- Add a ttCombobox for the size selection.
- Add a ttRadiobox for the crust type. The oriention will be vertical. We want the entire box to light up when selected so we are setting the indicatoron=False, which is a tk feature, so usetk=True.
- Same.
- Add the ttListbox for toppings. We also want this to be vertical and we want to be able to select multiple toppings without pressing the Control or Shift keys. This shows how a listbox can be used instead of a checkbox.
- Add the ttCheckbox for extra cheese and/or sauce.
- Add a single command button, ‘addpizza’, that adds the pizza to the order.
- Same.
- Add a ttText widget to show the order.
- Add the two command buttons defined in line 19.
- Plot the ‘name’ entry at column 0, row 0, with a five pixel spacing.
- Plot the order ‘type’ radiobox at column 1, row 0, with a five pixel spacing.
- Plot the line at column 0, row 1 strectched across all of the row with a 10 pixel spacing. If we did not use the sticky=’we’ option, the line would be a single point!
- Plot the ‘size’ combobox at column 0, row 2, with a 5 pixel spacing.
- Plot the ‘crust’ radiobox at column 1, row 2, with a 5 pixel spacing.
- Plot the ‘toppings’ listbox at column 0, row 3, with a 5 pixel spacing.
- Plot the ‘extras’ radiobox at column 1, row 3, with a 5 pixel spacing.
- Plot the ‘addpizza’ button at column 0, row 4, spread across both columns, with a 10 pixel spacing.
- Plot the ‘summary’ text widget at column 0, row 5, spread across both columns, with a 5 pixel spacing.
- Plot the ‘command’ buttons at column 0, row 6, spread across both columns, with a 10 pixel spacing.
- Set the ‘size’ combobox to ‘Medium’.
- Blank line.
- This method adds a pizza to the order.
- Method documentation
- Get the ‘size’ and the ‘crust’ selections and create an order str.
- Collect all the ‘toppings’ selection create a new str.
- Add the ‘toppings’ str to the order str.
- Collect the ‘extras’ selection and create a new str.
- Add the ‘extras’ selection to the order str.
- Add the ‘order’ str to the ‘order’ text widget.
- Call the
clearPizzamethod. - Blank line.
- This method would send an order to another display or computer. Here we are just printing the order to the console.
- Method documentation.
- Create a summary str with the customer ‘name’ and the order ‘type’.
- Get the contents of the ‘summary’ text widget.
- Show the summary in a pop-up window. Normally this would go to a different display or computer.
- Call the clearPizza method.
- Clear the ‘name’ entry.
- Clear the selections in the order ‘type’ radiobox.
- Clear the ‘summary’ text widget.
- Blank line.
- This method will clear a pizza off of the widgets.
- Method documentation
- Set the ‘size’ combobox to ‘Medium’
- Clear the selection in the ‘crust’ radiobox.
- Clear the selections in the ‘toppings’ listbox.
- Clear the selections in the ‘extras’ checkbox.
- Blank line.
- The main function.
- Function documentation.
- Create an instance of PizzaGui.
- Create the GUI.
- Start the event loop.
- Blank line.
- Run
mainif not importing.
In this example, we see that the choice of which widget to use and how they appear is completely up to the programmer. Novice programmers are encouraged to try out different options to see which widgets meet their needs.
Dynamically Changing Widgets
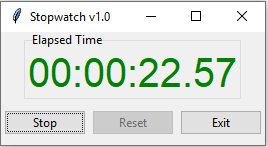
The next example is a simple implementation of a digital stopwatch that demonstrates how to change a widget dynamically. Tkintertoy uses both tk and ttk widgets. The appearance of ttk widgets are changed using the concept of ttStyles which will be shown. In addition, this example will show how to change a widget state from enabled to disabled. This example will also show how to separate the implementation and the gui code into two separate classes. Lastly, this code will demonstrate how a complete application based on Tkintertoy could be written. We will stay with inheritance style coding.
Below is a screenshot:
Here is the code:
Here are the line explanations:
- File documentation. While this is a first example, all files should have a some documentation on first lines.
- Blank line.
- We will need the time function from the time module.
- Import
Windowfrom tkintertoy. - Blank line.
- Define a function,
sec2hmscwhich will change floating seconds into (hours, minutes, seconds, centiseconds). Notice how type hints work. While the Python interpeter will take no action, other tools might find a use for them. - Function documentation string.
- Split decimal seconds into whole hours with a remainder. This is an example of tuple unpacking.
- Split the remainder into whole minutes with a remainder.
- Split the remainder into whole seconds and centiseconds.
- Return the time values as a tuple.
- Blank line.
- Define the
Stopwatchclass which will encapsulate a stopwatch. Since there is no suitable object to inherit from, we will use compositon. - Class documentation string.
- Blank line.
- Create the
__init__method. This will initialize the stopwatch by callingreset. - Method documentation string.
- Call
reset. Since this will be the first time this method was called it will create an attributes which will hold the beginning time, the time elapsed while stopped, and the running flag. - Blank line.
- Create the
startmethod. This will start the stopwatch. - Method documentation string.
- Get the current time and save it in the
thenattribute. - If the
elapsedattribute is non-zero… - The stopwatch has been stopped and
thenneeds to be adjusted. - Set the
runningattribute to True. - Blank line.
- Create the
checkmethod. This method will return the elapsed time as a tuple. - Method documentation string.
- If the stopwatch is running…
- Get the current time.
- Adjust
elapsedwith the current time. - In any case, call convert the decimal seconds to a time tuple
- Return the time tuple.
- Blank line.
- Create the
stopmethod. This will stop the stopwatch. - This is the method documentation string.
- Update the elapsed time by calling
check.. - Set
runningto False. - Blank line.
- Create the
resetmethod. This resets the stopwatch. - Method documentation string.
- Reset all the attributes to the initial state.
- Same.
- Same.
- Blank line.
- Create the
Guiclass. This class will contain the gui for the stopwatch. We will use inheritance. - This is the class documentation string.
- Blank line.
- Create the
__init__method which will initialize the gui. - Mehod documentation string.
- Create an instance of a
Windowwhich will beself. - Save the inputted Stopwatch as the
stopwattribute. - Blank line.
- Create the
makeGuimethod which will create the gui and begin a display loop. - Method documentation string.
- Set the title of the window.
- Create a ttStyle which has large red characters. This is how we will color our ttLabel in
the stopped state. We don’t want the user to input anything so a label is the correct choice of widget.
Notice that the style must be created for each type of widget. Since this style is for labels, the tag
must end with
.TLabel. - Same.
- Create a ttStyle which has large green characters. The is how we will color our label in the running state.
- Same.
- Create a ttlabel which will hold the elapsed time of the stopwatch.
- Create a list of button labels and commands,
buttons, for the buttons. Note the commands are Gui methods. - Same.
- Create a row of ttButtons which will be initialized using the labels and commands
in
buttons. - Plot the ‘elapsed’ at column 0, row 0.
- Plot the ‘buttons’ at column 0, row 1, with a 10 pixel spacing.
- Update the gui.
- Blank line.
- Create the
startstopmethod. Since the user will start and stop the stopwatch using the same button, this method will have do handle both tasks. - This is the method documentation string.
- If the stopwatch is running…
- Stop it.
- Retext the first button as ‘Start’. It was ‘Stop’. This is the method to use to change a widget dynamically.
- Change the ‘elapsed’ color to red.
- Enable the ‘Reset’ button. ‘Reset’ should only be used while the stopwatch is stopped. The ! means “not” so we are setting the state of the second button to “not disabled” which enables it.
- Else, the stopwatch was stopped…
- Start the stopwatch.
- Retext the first button as ‘Stop’. It was ‘Start’.
- Change the ‘elapsed’ color to green.
- Disable the ‘Reset’ button.
- Blank line.
- Create the
resetmethod, which will reset the stopwatch. Since this is connected to the ‘Reset’ button and this button is disabled unless the stopwatch is stopped, this method can only be executed while the stopwatch is stopped. - Method documentation string.
- Reset the stopwatch.
- Blank line.
- Create the
updatemethod which shows the elapsed time in ‘elapsed’. - Method documentation string.
- Get the elapsed time as a time tuple, (hours, minutes, seconds, centiseconds).
- Create a template for the
formatstring method that will convert each time element as a two digit number with leading leading zero separated by colons. If the time tuple was (0, 12, 6, 13) this template convert it to ‘00:12:06:13’. - Using the template, convert the time tuple into a string.
- Update ‘elapsed’ with the time string.
- After 0.01 seconds, call
updateagain. This allows the stopwatch to update its display every hundredth of a second. Every Tkintertoy window has a master attribute which has many useful methods you can call. This line interrupts the event processing loop every 0.01 second which makes sure that the stopwatch is displaying the correct elapsed time. - Blank line.
- Create the
mainfunction. - Function documentation.
- Create a stopwatch.
- Create the gui instance.
- Make the gui.
- Start the event processing loop.
- Run
mainif not importing.
Conclusion
It is hoped that with Tkintertoy and the included documentation, a Python instructor can quickly lead a novice Python programmer out of the boring world of command-line interfaces and join the fun world of GUI programming. To see all the widgets that Tkintertoy supports, run ttgallery.py. As always, looking at the code can be very instructive.
As a result of the classes I have been teaching, I have created a series of narrated slideshows on YouTube as Programming on Purpose with Python which features how to use Tkintertoy to develop complete applications. Just search for Mike Callahan and programming.